Author Archives: cee
Coffee and a cookie

Courier Coffee. 923 Southwest Oak St. Portland, OR
How to Export a Cat From Thailand to the USA
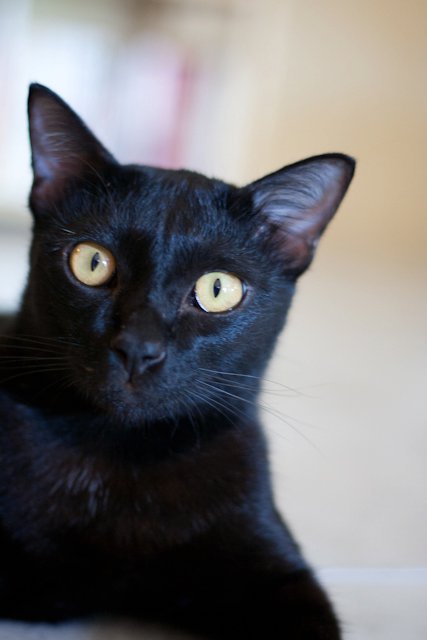
แมวอินเตอร์… international cat of mystery
Emma brought her cat “Pumpoi” from Thailand to the US and wrote up this how-to. I figured I’d post it here in case anyone was interested. Her post follows:
Please note that different countries require a variety of import arrangements
At Least 6 Weeks Before
- Your cat must be at least 6 months old
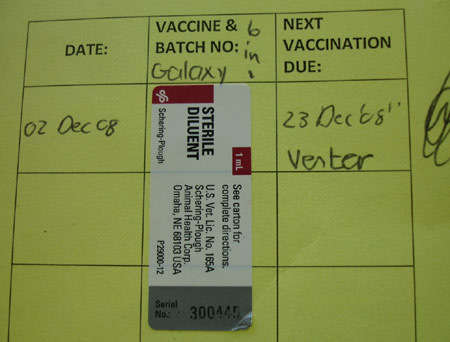
- Make sure that your cat is vaccinated against rabies at least 30 days prior to you wishing to leave the country. Every cat needs a rabies booster before they leave the country. You must have the original vaccination record with the correct stickers and dates as well as the vet’s contact details clearly displayed.
- Decide if you wish to bring your cat on to the plane or have it as checked baggage or as checked as cargo. Bringing a cat onto a plane means you will be confining it to a smaller space than if it is checked baggage or cargo.
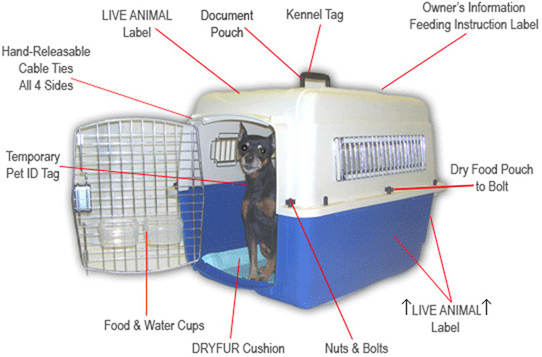
- Buy a cat crate that is the suitable size for your cat and that is airline approved. Crates are airline approved for ventilation and food and water requirements. Some airlines require metal fasteners on the corners of these pet carriers. Be sure to confirm with your airline that the style you need meets their specific construction requirements before purchasing. This can be challenging as the airline from the Thai end can be extremely unhelpful and insist that you purchase a crate first!
- Know the weight and size (height x width x length) of your crate which should be on the specifications. You will need to have this information ready when you contact your airline. You will also need to give them the weight of your cat. The reason is that this will determine the cost of your excess luggage when you go to pay at the airport check-in desk before your fly.
Booking Your Flight
- Book your flight – check that they have space for your cat before you confirm your booking as they only allow so many animals per flight.
- Contact the airline and explain that you wish to book a live animal onto the flight as carry-on or checked baggage/cargo. Get confirmation from them and a price quote for the cost of transport.
3 Days Prior To Departure
- 3 days (no more than this – even if in some places you see it mentioned that 7 days is ok, sometimes it is not!) prior to your departure you must go to the Bangkok Suvarnabhumi Airport Customs and Animal Quarantine Office. All pets must be inspected by the government vet before leaving the country.
- You must bring with you to the quarantine office:
- Original rabies certificate, with vet’s contact details and phone number (in English and legible).
- A copy of your passport
- Your flight details
- Cat micro-chip number if you have one (not necessary to have a microchip, but if you do have one, you need the number).
- Your cat!
- At the office you will need to fill in a Form 1/1 which is an export request. You do not need to do this before hand.
- At the office the vet will conduct a health check, take a photograph of your cat and give you the documents you require for export. This costs 50 Baht per cat.
- Make two photocopies of all documents and keep them with you when you travel. You should have:
- Your original cat health certificate
- The airport vet health certificate
- The export permit
- Familiarise your cat with the crate it will be travelling in. It helps to leave something with your scent in there for the trip. Planes are cold so make sure that your cat is going to be warm enough by adding blankets etc.
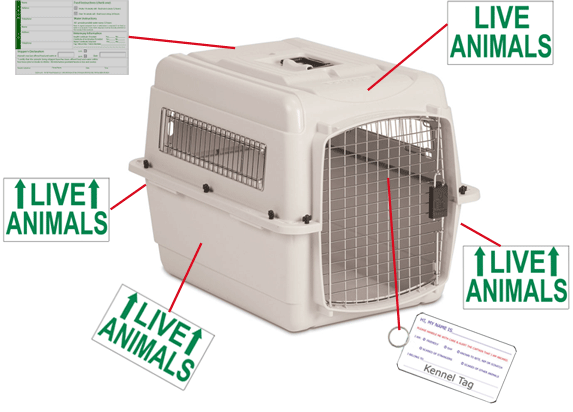
- Your crate must be properly labelled with arrows to show right way up and ‘live animal’ in words 2 inches tall. You also need to leave feeding instructions and have your details on the crate.
- Line the bottom of the crate with newspaper and/or absorbent pads. Do not use straw or other grassy materials as the importation of plant material is prohibited.
Customs Free Zone

Suvarnabhumi International Airport

Bangkok, Thailand

Tel +66 (0) 2134 0731
At the Airport
- Make sure you have enough money with you at the airport as either Thai Baht or as US Dollars to pay for the excess baggage.
- Check in as early as possible so that if there are any problems you have some extra time to sort them out.
- Hand over the paperwork you received from the airport vet when you go to check in. They may ask for copies of the health certificate – in which case hand these over now. They will then tape these to the cat crate.
- If your cat is going to be transported as excess baggage you will need to bring them to the oversize baggage area before you go through customs.
On The Plane
- When you are in your seat, you should get a confirmation from the air steward that your cat has been loaded onto the flight. If not, you can ask them to check prior to departure.
At Your Destination
- Make sure you check the box on the customs form that you will be bringing a live animal into the country.
- A customs official may want to check your cat at the destination.
- If you checked your cat as excess baggage then collect your cat after passing through customs.
Blueberry Pie

Blueberry Pie
Crust
- 2 1/2 cups all purpose flour
- 2 tablespoons sugar
- 1/2 teaspoon salt
- 1 cup cold unsalted butter, cut into small pieces
- 6 tablespoons ice water
Filling
- 1 qt blueberries (4 cups, 1 1/2 lbs, 680g, or enough for a pie)
- 1 tablespoon lemon juice
- 1/3 cup (or less?) brown sugar – depends on how sweet your berries are.
- 3 tablespoons flour or cornstarch
- 1/4 teaspoon salt
- Cut the cold butter into the sifted flour, sugar and salt until crumbly. You can either use a pastry cutter or a stand mixer on low (with the paddle attachment), or even a fork or two knives. Add the freezing cold water a little at a time until the dough is wet enough. It shouldn’t be sticky but should hold together. Kneed just a few seconds to bring it together, then divide into two round flat rounds and place in the freezer for 15 minutes.
- While the dough is freezing, wash the blueberries and add to a bowl. Add the lemon juice, brown sugar, flour (or cornstarch), and salt. Mix.
- Heat your oven to 375°F (190°C) and take one dough round out of the freezer.
- Flour your counter, the dough and the rolling pin and roll until about 11″ across. Place over your 9″ pie pan and pat down well. Trim the edges and place back in the freezer. Take out the remaining dough round.
- Roll out this dough into more of a rectangle to about the same thickness as your previous dough. Cut into long strips about 1″ (2cm) wide. I to use a zig-zag pastry cutter for a nice edge, but you can use a butter knife too.
- Remove your pie crust from the freezer and fill with the blueberries.
- Now we’ll make the lattice top. Place strips across the top in one direction only. Fold every other one back at the half way point. Place one strip across and bring all the strips back down. Fold the other half of the strips up and repeat. When you get to the end of the pie, turn it to do the other half. Fold the strips under the first crust and crimp the edges.
- Bake for 50-55 minutes or until the filling is thick and bubbling and the crust is browned. I recommend placing a cookie sheet under the pie in case it leaks.

Crumpets
Crumpets
- 1/4 cup water
- 1/2 cup milk
- 1 teaspoon sugar
- 1 tablespoon butter
- 2 teaspoons instant yeast
- 1 egg
- 1/2 teaspoon salt
- 1 cup all purpose flour
- Add the water, milk, sugar and butter to a saucepan and heat until butter has melted. Do not boil. Allow to cool until warm.
- Add the yeast and cover for about 5 minutes, or until bubbly.
- Beat the egg and salt together in a large bowl. Add the mixture from the saucepan to the bowl and mix well. Sift the flour in and mix. Cover and leave in a warm place until doubled in size – about 45 minutes to an hour. (If your house is cold, you can heat your oven to about 150 degrees, then turn it off and place the bowl inside with the door open. You don’t want to cook the yeast, just keep it warm so it reacts faster.)
- When doubled, mix with a spoon to knock it down.
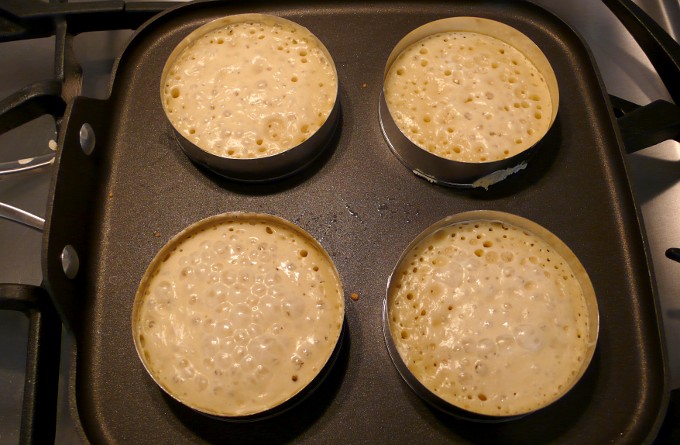
- Fill greased biscuit rings about 1/2 way with the batter and cook on a skillet over medium low heat until the tops are not shiny, the bubbles have popped, and the bottoms are browned.
Makes 6. Toast before eating (don’t cut in half like an english muffin, just throw the whole thing in the toaster as-is). Serve with butter and jam or Marmite. They freeze well. And don’t forget the tea!
 Posted on Friday, April 8th, 2011
 It's one of my
